Create a blog
To start a blog with Blogger, visit the
Blogger homepage, enter your username and password, and click
Sign in. Enter a display name and accept Blogger's Terms of Service. Then click the
Create a Blog link and get started!
Pick an address (URL) and a blog title. Then, choose your favorite
blog template (this is how your blog will look when you publish it). Now
get creative, add information to your personal profile, and customize
how your blog looks, if you feel up to it. Start blogging now!
Dashboard
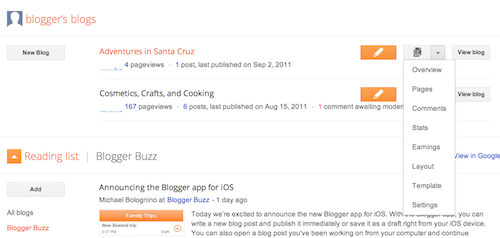
Your Dashboard, as always, is your starting point. This is where all
your blogs are listed, and you can click on the icons next to them to
perform various actions on each blog, such as:
- Writing a new post: Just click on the orange Pencil icon on your Dashboard to access the Post Editor.
- Viewing your posts: The gray Post List icon will take you to a list of your published and drafted posts for a specific blog.
- Catching up on your favorite blogs: Below the list of your own blogs, you’ll see a list of the blogs you follow with an excerpt from their latest posts.
- Everything else: Check out the drop-down menu next to the Post List icon for a quick link to:
- Overview
- Posts
- Pages
- Comments
- Stats
- Earnings
- Layout
- Template
- Settings
Overview
you can customize your blog's design using our intuitive drag-and-drop interface. You can also add powerful gadgets such as slideshows, user polls, or even AdSense ads.
If you want more precise control over your blog's layout, you can also
use the Edit HTML feature. To edit your blog's layout, follow these
steps:
- Click Layout from the drop-down menu on your dashboard below the blog you would like to customize.
- From there, click Edit to edit existing gadgets, or Add a Gadget to add new ones.
- To add a new gadget after you've clicked Add a Gadget,
simply click the plus sign next to your desired gadget. You can choose
from gadgets by category, or search for a specific gadget in the top
right of the pop-up window.
Privacy and permissions
By default, your blog is completely public, and can be read by anyone
on the internet. However, if you want to keep it private, you can do
that, too. You can change these settings on the
Settings | Basic tab.
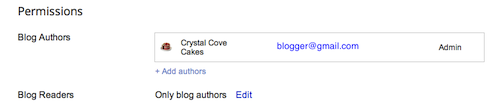
- Under the 'Blog Readers' section, you'll probably see 'Anybody'
selected as the default. When you change this to 'Only these readers,'
you'll get an Add Readers button.
- Click the Add Readers button and then enter the
email address of a person to whom you'd like to grant access to your
blog. To add multiple people, separate their addresses with commas.
- For each address entered, the Google Account associated with that
address will be given access to view your blog. If an address is not
associated with an account, that person will receive an invitation email
with a link allowing them do one of three things:


 Posts
Posts


